
You’ve decided to turn that longbox lead into bookshelf gold but don’t know how to start? This week’s Shelf Bound will get you up-to-speed on everything you need!
It’s important to point out right up front that although we focus on professional binderies, binding comics at home is something people can do without industrial-strength sewing machines and smelting tools. Uncollected Editions has some wonderful tutorials on home binding. If you decide to take up the challenge of binding at home, drop me a line at greg@multiversitycomics.com or @gregmatiasevich and let us know how it turns out!
For the rest of us, those floppy comics go to hardcovered binds by way of a bindery. A comics binder’s relationship with their bindery is kinda like the one they have with their hair stylist or barber; not one entered into lightly. You have an idea of what you want, ask around for recommendations, pick one, tell them what you want and see what happens. Some times it works, some times it doesn’t, and some times they can give you what you clearly wanted instead of what you actually asked for.
If you’re new to binding, you might not even have an idea yet of what you want. Yes, comics into books – but books come in all shapes, sizes, colors, and types. That range and the freedom it brings can quickly turn daunting (“Half-bind? Smythe sewn? Trimmed? Arrestox? What the . . . ?!?! Man, I just want these comics on my shelf!”), but Shelf Bound is here to help with this binding primer.
Let’s start by getting the two questions I get asked most often out of the way:
#1 – HOW MUCH DO THEY COST?
It depends.
Bind costs usually start with a base price-per-book and increase as options are added. Ballpark basic bind starting prices seem to be between $25/book and $50+/book. Those prices are also based on non-binding factors (bindery overhead & operation costs, for example) so the binder with a cheaper starting price doesn’t necessarily deliver a weaker product than one with the higher priced option.
Total cost can add up quickly, but paying more than $75/per book seems rare unless additional design help on top of the binding options mentioned below is thrown in.
#2 – HOW MANY COMICS CAN I GET IN A BOOK?
It depends.
Binderies see books as solid blocks of paper, not groups of separate issues. As long as your comics stack is under 2 inches thick, they can comfortably make a book out of it. More than inches usually incurs an additional cost if the bindery can do it at all. Use a compressed, non-spine edge of your comic stack for this measurement; spine staples won’t compress well and tend to throw off the final result.
#2A – HOW MANY COMICS CAN I GET IN A 2″ TEXT BLOCK
It depends. (There seems to be a pattern forming . . . )
Less than six standard-length (22-24 pages) comics and chances are your text block isn’t large enough to offset the hardcover casing in a comfortable way. More than 24 standard issues and the text block size starts causing excessive gutter loss, especially with full-bleed pages, as we’ll go into greater detail about below. All other things being equal, 6 to 24 standard-size issues is a safe range to start with.
You also don’t have to limit yourself to just stapled (aka saddle-stitched) single issuess. Prestige Format comics, trade paperbacks, even hardcovers can mixed with singles in a text block, or multiple collections can be bound together. Just do yourself a favor and strip off the front & back covers before inserting them into your text block. Seems obvious with hardcovers, but even softcover trades & Prestige Format issues whose cardstock covers can be included in theory, in practice their heavier paper stock makes reading around those covers incredibly awkward.

I’ve discovered that magazine-size comic bags are a quick & easy measuring stick for how much can fit in one book. If your text block fits in one without splitting the sides, you should be good to go. Those bags are also useful for handling text blocks in general, either for storage (as above) or in sending off to the binder.
Continued belowBINDING METHODS, PAPER STOCKS, AND THE DREADED GUTTER LOSS
So what things were I referring to for the 6-24 issue range to work?
Gutter Loss
Take your text block firmly in your hand like a book and flip through the pages. Look at the middle where the left & right pages meet. Notice how art or word balloons occasionally get swallowed up in that crease? Gutter loss. It happens in every book, and gets more pronounced the bigger the text block. As you can imagine, gutter loss can have a minimal or severe impact on your bind’s readability.
Older comics with traditional grid page layouts and wide panel margins handle gutter loss better because the space lost is gutter or ‘dead’ space. But comics since, say, the mid-80’s especially have embraced full-bleed layouts covering the entire page in ‘live’ artwork that, by definition, doesn’t have any empty space, so something’s going to be sacrificed. How much ‘live’ content is lost can be mitigated by picking a complimentary binding method for your book’s contents.
Binding Method
Three binding methods to consider: oversewn, glued, and handsewn.
- Oversewn – Thread is passed through holes punched near one edge of the sheet stack, sewing a spine turning the loose-leaf pages into one solid block, after which said spine is reinforced with glued-on cloth. The most common binding method; sturdy, durable, some gutter loss.
- Glued / Doublefan Adhesive – The spine-to-be edge is trimmed and secured to a cloth base using ~1/16″ of adhesive. Since no thread is sewn further up into the book like the oversewn method, the book will lay flatter when opened and allow more gutter visibility. A popular method with reduced gutter loss, but not without durability concerns (see below).
- Handsewn / Smyth sewn – Each comic to be included has thread run through its spine (roughly where the staples used to be). Those threads are then secured to form the spine of the text block. Results in a sturdy product with least amount of gutter loss of the three binding methods. Two main drawbacks are (1) a higher cost due to the extra labor involved, and (2) each comic or set of pages/signatures MUST be intact to retain a spine for the thread to be sewn through.
Here’s a Mind MGMT bind I had done using Smythe sewing. One of Mind MGMT‘s perks was Kindt’s using every inch of the page for storytelling, including cryptic text near the gutter. Bind this series using oversewing and that material disappears. Dark Horse used a toothy newsprint-like paper that would take glue binding well, but I wasn’t as familiar with the technique at the time I made this, so I opted to go Smythe sewn. The end result looks great and lets you read the gutter material with zero difficulty.
Paper Stock
The text block’s paper stock is another variable to factor in, as I just mentioned. Let’s keep things simple and focus on these two categories:
- Pages that feel slick with a bit of glare on them from lights at certain angles are most likely on a coated paper stock.
- Rougher pages, with slightly duller/muted colors and no light glare are probably on an uncoated stock.
So what, you might ask?
Coating adds weight to the paper. Not noticeable on the individual comic level, but a slab of 24 coated-stock issues will feel heavier than a slab on uncoated stock.
More importantly, coating works against binding glue grabbing hold of the paper as quickly or strongly as it normally would. The better binders have and know to use different glue types or application strategies to offset this, but over the years that glue-bound coated-stock book will have an increased chance of having its pages come loose over an oversewn or Smythe-sewn book. And gravity might pull a larger text block loose quicker than a smaller text block, so you might want to go with less issues per book if you go coated-stock glue bind. Something to keep in mind and definitely talk to your binder about.
PREPPING THE TEXT BLOCK
Continued belowDifferent binders have different requirements, obviously, but here are some universal book-prepping factors:
Staples
Staples need to be removed before the comics can be bound. Most binders can do that step for you, but almost always for an additional fee or increased turnaround time. Popping them out with a standard office staple remover before sending off your books isn’t anyone’s idea of fun (especially 20-30 issue text blocks at a time) but a little front-end effort can save you time and money on the backend.
Ads/Back Covers/Unwanted Pages
Let’s think about a comic purely as an object for a second:
Open up a 24-page comic in front of you and you can see it’s really just eight 13″ x 10.25″ sheets (seven sheets for the interior material and one cover sheet at the bottom) stapled twice in the center and folded in half. Each side of each sheet has two pages printed on it (left and right), with the middle fold separating them. So therefore each sheet has a total of four pages printed on it, arranged in such a way that when those sheets are assembled in a certain order, those pages will line up and flow in the intended reading over when the comic is assembled. Magic!
But just because those sheets start off as a particular comic doesn’t mean they need to stay together; each sheet is ultimately independent of the others. You can rearrange, drop, or split them as you see fit for your text block. We’ll pick up this ball and run with it in the weeks and months to come, but the big takeaway here is that removing pages or covers you don’t want is possible.
For example, if you want to bind some mid-2002 Marvel comics but want to forget those omnipresent Spider-Man/Jay Leno backups were a thing, you can take those pages out. My personal preference is just ripping the sheet right out. Lay the comic open, press down firmly at the gutter on the opposite side of the offending page (maybe use a ruler or straight edge to spread the counter-pressure), grab the page in the upper right corner (or flip everything and grab from the left, depending on your hand preference), and pull down. Quick, easy, and surprisingly satisfying, if only to hear the phantom fanboy wailing and gnashing of teeth when I do it.
But before you start rending pulp, two things to consider:
1. Remember: every page you take out has TWO sides. Spider-Jay may irritate you beyond all rational thought, but if it shares a page-flip with a story page you want to keep, you’re out of luck (or experiencing Parker Luck, however you want to look at it).
2. To keep Smythe-sewing as a binding option when removing pages, you have to take out the offending material’s entire sheet. This affects FOUR pages of the comic, and usually pages that come from opposite ends of the issue due to the weird logistics of printing. Tearing out just the sheet side you don’t want destroys the gutter needed for Smythe-sewing to work. Proceed with caution.
BINDER CRITERIA
This bindery list on Uncollected Editions is a good place to start your bindery search. Checking out the wider forum before hitting the Google might help as well, as some binderies have dedicated threads and feedback to check out.
Choosing a bindery typically involves these questions:
- How much do their books cost? Probably the biggest decision factor.
- Do they offer a discount for bulk orders? How many books are you looking to make? Just a one-off here and there, or do you have a complete run of X-books from the days of Stan & Jack to House of X you’re looking to get up on the shelf (or shelves)?
- Do they have specific experience binding comics? Not every binder has COMICS binding experience. While there isn’t a lot unique to comics, having a binder knows how to handle that gatefold foldout cover you forgot to flag in your text block, for instance, is preferable to one that doesn’t know to give it an extra fold that keeps it away from the blade that trims the block.Continued below
- Do they offer to design a cover/table of contents for me, or will I do that myself? More and more binderies offer in-house design services. If you want things like tables of contents, art covers, or custom-designed dustjackets without shouldering the burden of making them yourself, some binderies offer those options as add-ons.
- Can they accommodate any special requirements my book might have? No two binders are alike; some of them are more high-end/”bells & whistles” boutique shops (having more cover material color options or more die stamps available, for example), while others lean towards a more low-cost/no-frills product. Knowing which is which is a good thing.
- Where are they located? Having a binder within driving distance is by no means essential, but can offer some nice perks. For one, being able to drop off packages means eliminating mailing costs for your projects. It also means being able to see their operation first-hand and ask questions, getting a better understanding of what they do and how they do it.
Here are some binderies I see consistently used and name-checked on Uncollected Editions:
A commercial bindery based in Nebraska, Houchen offers a wide array of binding options, including art-on-cover printing, dustjackets, and bulk discounts for orders over a certain number of books.
Herring & Robinson is a smaller, family-run bindery located just south of San Francisco. Their amenities list isn’t as robust as Houchen’s (no art-on-cover or dustjackets, for example), but still deliver a quality product at a reasonable price with reliable and knowledgeable service. (Full disclosure: Herring & Robinson is my bindery of choice.)
For those of you in the UK, Hollingworth & Moss seems to be the go-to bindery for comics. I haven’t had a chance to use them myself, but the pics I’ve seen of their work looks pretty snazzy!
PUTTING IT ALL TOGETHER
Enough theory; time take this hot rod of binding knowledge out for a spin!
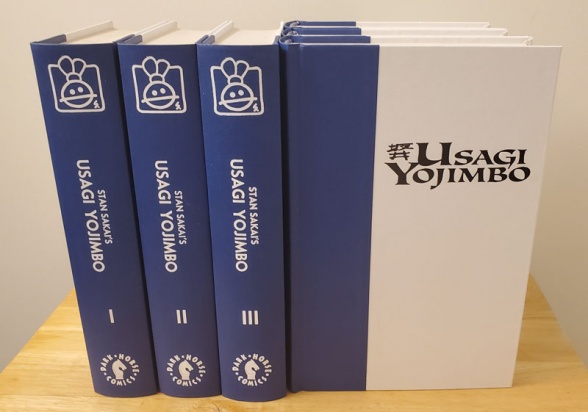
Let’s say I’m looking to bind the first 144 issues of Stan Sakai’s Usagi Yojimbo run at Dark Horse at Herring & Robinson.
NUMBER OF BOOKS
144 issues means we’re looking at six books of 24 issues, give or take. One of the benefits of Usagi is Sakai’s preference for one- or two-part stories means much less chance of breaking off a book’s contents in the middle of a story. 24-issue books are on the large end of the spectrum for my tastes, but Usagi used uncoated paper so the final books should be manageable. I could spread that range over seven books, making each book a little thinner, but since I want to give these books a little extra pizzazz I’m considering options that raise the per-book price, so six looks more attractive than seven. The base book price at H&R is $22.50.
1 book = $22.50
6 books = $135
COVER TYPE & MATERIAL
Usagi’s traditional costuming favors blue and white, so even though I’m not doing art-on-covers I’ll have the book reflect this by having them set as half-binds (blue on the spine, white on the front & back). Arrestox is the subtlest of the available cover material, so I choose that. Half-binds are an extra $15/book; cover material is included in base book price.
Half-bind for 1 book = $15
Half-bind for 6 books = $90
BINDING METHOD & EXTRAS
Since Usagi ran virtually without ads and had color character portraits on the back covers, there’s nothing I feel the need to take out. Though the covers are coated, the interiors are printed on uncoated stock. Sakai used traditional grid layouts that will keep gutter loss from taking out too much ‘live’ art or text, so no need to use Smythe sewing for gutter loss purposes. Oversewn or glue binding are equally reasonable choices and are included in the base book price.
The other pizzazz upgrade I want is die stamping, so each book will have three dies stamped on their cover from H&R’s stamp library: Sakai’s Usagi icon on the top of the spine, the circular Dark Horse logo at the bottom, and a Usagi Yojimbo logo on the front cover. Each impression is $6, so this adds a total of $18 per Usagi book. Blue & white headbands are $2.50/book.
Continued belowHeadbands and 3 stamp impressions for 1 book = $20.50
Headbands and 3 stamp impressions for 6 books = $123
GRAND TOTAL
Doing the math gives us a grand total (before tax & shipping) of $53 per book or $348 for all 6 books.
BINDING SLIPS
After I’ve prepped each book, I fill out one of H&R’s binding slips like so:
- New/Match/Repeat – Lets them know if:
- NEW – The book is a one-off bind.
- MATCH – The book and any others also flagged in the order need to be handled as a matched set, with identical or complimentary formatting. For instance, if you have a two-book set with widely different trim sizes (think regular comic size and deluxe hardcover size), checking this box helps the binder remember to adjust the spine text centering so that one book’s spine text lines up next to the other, even though standard practice would just center the text based on individual spine height, resulting in mismatched spine text.
For this Usagi slip, I should have checked NEW and MATCH, since I sent in volume 2 as well in that batch. Ooops!
- REPEAT – The book is unique to this order but should match the formatting and style of a bind from a previous order. And in the case of sending in an order containing multiple books that are part of an ongoing bind series, both MATCH and REPEAT would be checked (the books need to be consistent to each other AND match up with the previous binds as much as possible).
- Lettering – Color choices for lettering stamped into the cover. Some binders (like H&R) can use more than one color, which opens up some nice color and design possibilities without having to go full art-on-cover. Going the multicolor route means being VERY specific about what text is what color when writing it on your slip.
- Head & Tail Bands – These are the cloth bands at the top and bottom of the book spine. Not necessary for the book to stay together, I personally feel hardcover books look weird without them. Black & white is my default unless the bind cover as a strong color scheme to align with. With Usagi, blue & white is an option.
- Ribbon Marker – Just what it sounds like; a bookmark ribbon.
- Panel Lines – Extra lines stamped into the cover, primarily used as visual text dividers. Usually incurs an extra charge.
- Front Cover Lettering – Just what it sounds like. Usually incurs an extra charge.
- Die Stamp – Here’s where you can have one of the special die stamps for company logos, book logos, and the like. You can see the Herring & Robinson die stamps collection here.
- Color Chart – This is the material and color for the outer covering. Buckram is the most resilient; think school library books. Arrestox is more of a cloth material, and comes with more color options. Imitation and Bonded Leather are also options.
- Edge Trimming – Whether or not you want them to chop off material from the three remaining unbound sides. Upside to this is it gives your stack of comics that clean, professional look. Downside is you are losing part of the page, so full-bleed artwork will be lost, as will the folds of any foldout covers you don’t have tagged to be saved. For Usagi, I have all the books trimmed but make sure to flag the book with the foldout covers so they know to fold those pages in and away from the cutting blade.
- Endpapers – The paper just inside the cover. Traditionally white, but other colors can be used. If you’re looking to get books signed & sketched, white gives the most flexibility. But sometimes black is just cooler . . .
- Special Instructions – This is where you can elaborate on any of the earlier options. Say you sent in the next two books in your ongoing Batman bind series and two books in your ongoing X-Men bind series? This is where you make it clear what previous order needs to be referenced and which other book needs to match this one. Do you want to only have one particular side of your books trimmed? This is where you spell that out. If the box isn’t big enough, I usually bump my explanation over to the front cover box. Always better to have the info on the sheet they’re using while binding than in a email somewhere.Continued below
Don’t let the cover mock-up fool you; you don’t have to know Photoshop to fill out a binding slip. As long as you write clearly about spelling, general text placement/layout, and color (if you have text of multiple colors), you should be fine. A decent binder will try and contact you if they have questions or concerns.
(I do spine mockups in PS because my printing background has made me paranoid about everyone being on the right page in terms of expected final product. They’re as much for me to make sure I’m asking for what I think I’m asking for as they are for the binders. Plus, if I write in Blue Arrestox but my spine mockup is orange, they know to shoot me an email and double-check with me. I like redundancies!)
Speaking of which:
If you take only one thing away from this article, please let it be TRIPLE-CHECKING YOUR BINDING SLIPS BEFORE SENDING OUT YOUR BOOKS!
I cannot emphasize this enough. Your binder is NOT a mind reader. Most are more than willing to correct THEIR mistakes for free, but having them fix YOUR screw-ups gratis is a much rarer thing. Do everyone involved a favor and make sure what you indicate on the slip is what you want.
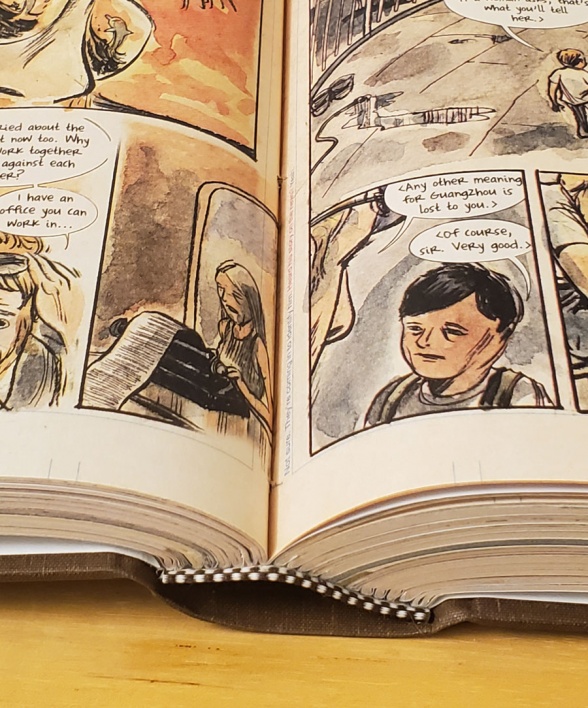
After sending out my comics with the correct binding slips, I eventually get this back in the mail:

You can see how the oversewing turned out on the closeup image. The books lay flat and while the ‘live’ area goes right up to the edge of the book gutter, nothing is actually lost thanks to Sakai’s use of panel/gutter space. You can also see how those blue & white headbands sync up well with the cover colors. Some binders see headbands as an extraneous thing, but to me, not having them there would be totally distracting, to say nothing of how they can really tie a bind together like the best of rugs.
Of course, I also think ribbon markers are a waste of time, so what the hell do I know?
IS IT STILL WORTH IT?
I certainly didn’t know Dark Horse would put out their own Usagi Yojimbo Saga full-size reprint line (the original Usagi trades use a smaller trim size closer to manga) a few years after I did this. And they look great! I highly recommend picking them up if you don’t already have the material.
But I’m not going to, because it was still worth it to have my comics bound:
- I’m not missing out on enough extra material to make the double-dip worthwhile – The UY Saga books do collect some one-off stories plus the original covers in full color sans trade dress as a backmatter galley and additional Sakai art pieces. But my binds more closely replicate the serial reading experience by having the covers where they fall with the stories and including the letters pages & full-color back cover pinups that the official books omit. Plus I could add those one-offs just as easily if I wanted, or include them in a later bind. Six of one, half a dozen of another.
- Buying the official books would cost as much, or more than the binds – The books’ contents don’t sync up exactly, as my run of issues starts at the backend of their Vol. 1 and finishes off in the front half of their Vol. 8, but it’s safe to say I’d have to buy seven of the UY Saga volumes to get my stories on my shelves in comparable editions.
- Their $80 cover price has me spending between $500-$560 at the LCS to do that, depending on discount.
- Shopping online drops the per-book cost to around $57 for a total of $400 — close-ish to the binding total when tax & shipping are added.
- That’s just comparing them to my gussied-up tomes! Dropping half-bind and stamp options for straightforward no-frills binds of those issues sees the previous $348 total plummet to $150 for the same six books.
And there’s no need to send all your books in at once. Yes, you can save a little on shipping, but good binders will be able to match subsequent volumes with earlier ones, especially if they bound the books before and kept specs or spine rubbings in their files.
Continued below - Putting these binds together lets me engage with the material on a different level just as satisfying, if not more so, than reading it.
- Creators love to see fans appreciating their work enough to put these things together.
And finally:
- Buying their books still leaves me with a shortbox worth of comics I’m now even LESS likely to read and defeats the original purpose of binding.
I hope this week’s column gives you some food for thought. Next week we’ll look at some of the different content approaches I’ve seen binders take, and what you might be seeing here at Shelf Bound moving forward. Feel free to drop me a line at greg@multiversitycomics.com or @gregmatiasevich with comments, questions, or suggestions!


