Among comic book creators, the collaboration between writer and artist is like a marriage. A perfect partnership often results in stories of exceptional quality that stand the test of time. Names like Lee and Kirby, Brubaker and Phillips, Azzarello and Risso, are examples of collaborators who make books that bring out the best of both talents.
There are typically two ways in which writers and artists work together. The first is the “full script” Method. Basically, the writer provides the artist with a detailed blueprint of what happens in the story. The specifics of every panel is sometimes addressed in painstaking detail. Writers like Alan Moore favor this approach. On the other hand, the “Marvel” Style is a viable alternative. This option lets the writer focus on the plotting and dialogue while letting the artist approach the panels, pacing, etc in a manner that he/she sees fit. Stan Lee and Jack Kirby laid the foundations for Marvel Comics using this technique. Quite a number of today’s writers tend to favor the ‘Full Script” method. “Copperhead” #2 is a fine showcase for the “Marvel” Style.
The first installment in this series was created using the “Full Script” Method and the results were great. However, owing to time constraints and satisfaction with artist Scott Godlewski’s work, writer Jay Faerber decided to give his collaborator greater control of the visual storytelling.
Written by Jay FaerberCover by Scott Godlewski
Illustrated by Scott Godlewski
Colored by Ron Riley
Lettered by Thomas MauerFind out why Brian K. Vaughan says “Copperhead is the best Image debut of the year and my favorite new comic,” as Sheriff Clara Bronson and Deputy Boo continue their investigation of a multiple homicide just outside the Copperhead city limits. Meanwhile, Zeke Bronson gets in way over his head in the Badlands.

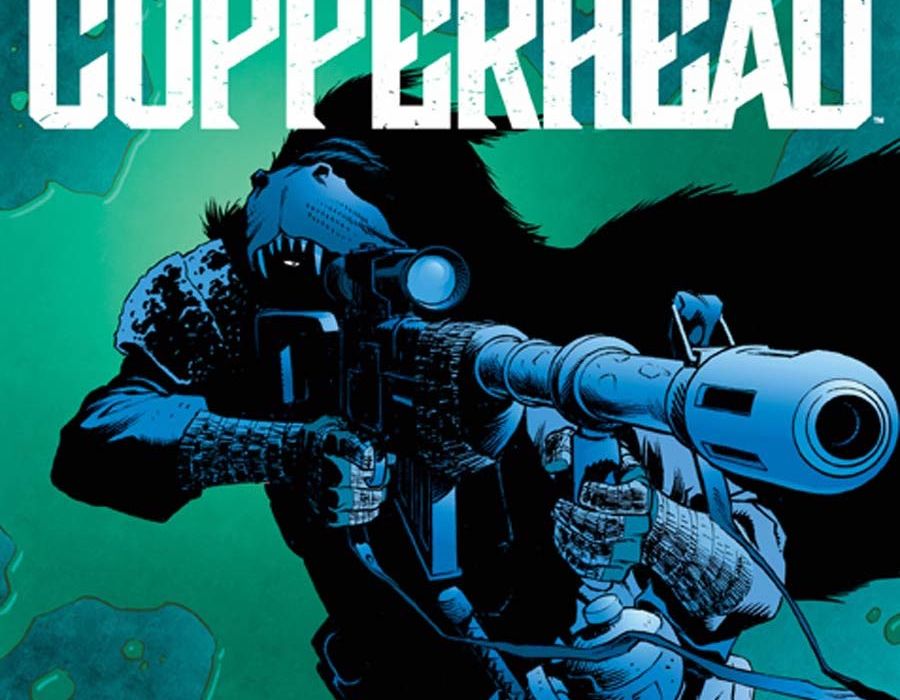
If you thought “Copperhead” #1 had a good cover, wait till you see what Godlweski delivered with this issue. Unusually, the cover is separated into two panels. The top one showcases the mysterious stranger from the previous issue’s cliffhanger aiming a scoped rifle. The bottom panel is a closeup of the skeletal remains of an alien jawbone. The contrasting cool and warm color scheme further enhances the striking imagery.
Page one hits the reader with an evocative splash page as the story picks up right after last issue’s cliffhanger. Zeke is shown holding up a green flare that provides low-key green lighting. This intensifies the sense of dread in both he and Annie’s faces as they stare at the mysterious off panel stranger.
The stranger introduces himself as Ishmael and tells them that he has no ill intent. Just as he warns them of the danger lurking in the badlands, they are surrounded by malevolent creatures. Meanwhile, as Clara and Boo examine the crime scene, one of the victims regains consciousness forcing Clara to rush to the saloon in order to find the local doctor.
Back at the badlands, Ishmael and the children are set upon by a horde of ravenous monsters. Ishmael skillfully defends the kids against overwhelming odds.
When Clara returns to the holding cells, she informs Missus Sewell that her entire family has been murdered. Missus Sewell blames Clara for the deaths of her loved ones. Clara goes home only to discover that Zeke and Annie are missing. Fortunately, Ishmael brings the children back safe and sound. The last page reveals that he carries an object taken from the crime scene thus implicating him in the murder of the Sewells.
“Copperhead” #2 takes place entirely at night. As a result, the artwork utilizes plenty of interesting techniques to create a vivid, high-contrast setting. The inking is superb: the cross-hatching and subtle shading make the book seem like a pleasurable reading experience minus colors. Additionally, the occasional use of lens flare, particularly on the last page, was an interesting touch.
The efforts of colorist Ron Riley are also worth noting. Green is the dominant color scheme for this issue. It shows up on the blood-stained crime scene, it’s on the flare that illuminates the night for the lost children, it’s all over Missus Sewell’s grief-stricken face.
Finally, letterer Thomas Mauer does a fine job of expressing sound effects. There is a tense fight scene that occurs in the badlands. The “Blam Blam” and “Budda Budda” sounds of the guns are done so effectively that when the scene ends with the “Clik Clik Clik,” the reader feels the characters’ terror in that moment. Sound effects are also used to communicate raw emotion. For instance, when MIssus Sewell learns of her family’s murder, the “Brumm” sound as she helplessly pounds her cell wall was conveyed in a mournful way that successfully captured the character’s grief.
After such an entertaining second installment, we look forward to seeing where the story goes and unravelling the mystery behind the murder of the Sewells.


